
Optical alignment device for two-photo microscopy
Abstract: Two-photon microscopy has revolutionized our understanding of brain structure and function through the high resolution and large penetration depth it offers. Investigating neural structures in vivo requires gaining optical access to the brain, which is typically achieved by replacing a part of the skull with one or several layers of cover glass windows. To compensate for the spherical aberrations caused by the presence of these layers of glass, collar-correction objectives are typically used. However, the efficiency of this correction has been shown to depend significantly on the tilt angle between the glass window surface and the optical axis of the imaging system.
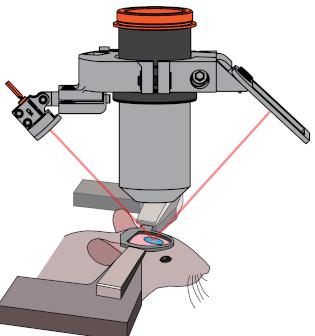
Here we present a simple optical alignment device designed to rapidly minimize the tilt angle in vivo and align the optical axis of the microscope perpendicularly to the glass window, thereby significantly improving the imaging quality. The performance of the device is demonstrated in an in vivo setting and a tilt-correction procedure is described, enabling the accurate alignment (<0.2°) of the cover glass with the imaging plane in only few iterations.
Assembly instructions:
The following page contains the information to purchase and print the parts necessary to assemble the optical alignment device.
Purchased parts:
| Name | Manufacturer | Part number |
| Miniature Laser diode | Roithner Lasertechnik | APCD-650-01-C3 |
| Photo battery Lithium 3 V 950 mAh | Distrelec | 169-01-539 |
| Battery holder 1/2 AA | Distrelec | 169-52-048 |
| Miniature toggle switch On-On 1P, MS-244 | Distrelec | 110-34-092 |
| Graph paper | Internet | |
| Additional parts for low magnification RMS objective (i.e. Nikon 4x, 0.13) | ||
| Laser holder | Thorlabs | C2A |
| Laser holder rod | Thorlabs | ER90C |
| SM1 to RMS adapter | Thorlabs | SM1A3 |
| Brass Microscope Adapter with External M32 x 0.75 Threads | Thorlabs | M32SM1S |
| SM1 Lens Tube | Thorlabs | SM1L10 |
| Slip Ring for SM1 Lens Tubes | Thorlabs | SM1RC/M |
| SM1 (1.035″-40) Locking Ring, | Thorlabs | SM1NT |
| Assortment of M3 and M4 screws & nuts |
Printed part list :
| Name | CAD file (access upon request) | STL file (please rename .pdf in .stl) |
| Laser_holder_support | http://a360.co/2HRSK4i | laser_holder_support |
| Laser_holder | http://a360.co/2HUpDxn | laser_holder |
| Laser_holder_cap | http://a360.co/2COdzdn | laser_holder_cap |
| Target_holder_support | http://a360.co/2F9gcMb | target_holder_support |
| Target_frame | https://a360.co/2r10AC8 | target_holder_frame |
Assembly instructions :
Once the parts are printed, the device can be assembled in the following way.
The device is divided into two main sub-groups, the laser holder support and the target holder support:
Assembling the laser holder side:
- Start by assembling the rod system encompassing the laser holding hinge (C2A) and the rod (ER90C) and insert them into the printed laser holder half-ring (laser_holder_support) in the following way (Fig 1(a)). Using an M3 screw and a nut, tighten the rod into the support.
- Tighten the rod (ER90C) to the device using a screw (Fig 1(b)).
- First place the laser in the laser_holder (Fig 1(c)) and then place the pinhole between the laser_holder and the laser_holder_cap and mount the sub-system to the hinge (C2A) (Fig 1(d)).
- Place the battery holder and the switch to the laser holder support (Fig 1(d)).
- Wire the laser to the switch and the battery, while respecting polarity of all elements.
 Figure 1
Assembling the target holder side:
- Once millimeter paper has been glued to the target, place it on the target holder support (target_holder_support) and tighten it using a screw and a nut (Fig 2.).
 Figure 2
Assembling the entire device on the slip ring.
- First, place the laser holder side on the slip ring with the threaded hole. Tighten the support to the slip ring using a screw (Fig 3 (a)).
- Place 2 M4 nuts in the sides of the laser holder support (laser_holder_support) and place the target holder (target_holder_support) on the slip ring, and secure it using 2 M4 screws (Fig 3 (b)).
 Figure 3
Angle grid:
To facilitate the angle estimation, the following grid pattern can be scaled, printed and glued on the lens tube on which the device is placed:

Online angle calculator:
Coming very soon (May 2018), in progress….